Technique 11 Inhibition of lumbar fascia, quadratus lumborum, and lumbar erector spinae from L1 to L5.
Patient
- Prone with head rotated towards you.
- A pillow may be placed under the abdomen.
Applicator
- Olecranon process of either forearm.
Therapist
- Stand by the side of the table near to the patient's lumbar spine.
- Place your olecranon process in the paravertebral gutter, on the same side of the spine that you are standing.
- Slide your applicator over a spinous process and into the paravertebral gutter on the opposite side of the spine so it sits against the medial border of the erector spinae.
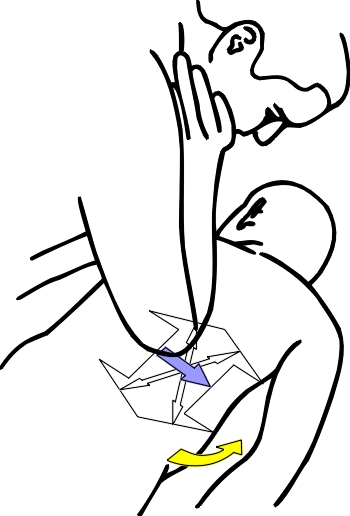 Figure 9.16
| Muscle Fibres | Primary Force | Secondary Force | Stretch Force | Contraction Force |
Tissue tension
- Take up the primary tissue tension with your applicator. Apply compression and then increase tissue tension using a transverse force.
- Work from medial to lateral and along parallel strips.
- There is no secondary tissue lockup.
- Longitudinal (stretch) tension is taken up by starting the technique with the spine sidebent towards you.
- A pillow may be placed under the patient's chest or abdomen to minimise hyperextension.
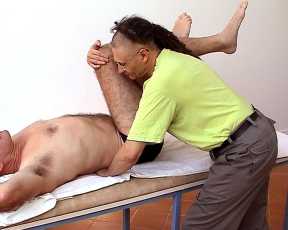
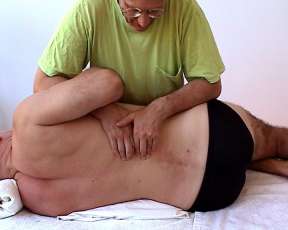
 Picture 9.11
Inhibition
- Press downwards towards the table with a medium to heavy pressure.
- Maintain compression as you slowly push away with a medial to lateral force.
- Increase your pressure when you encounter areas of tight thick lumbar fascia and hypertonic muscle.
- Your pressure should be just short of discomfort.
- Work with the patients breathing cycle of about 15 breaths per minute.
 Figure 9.17
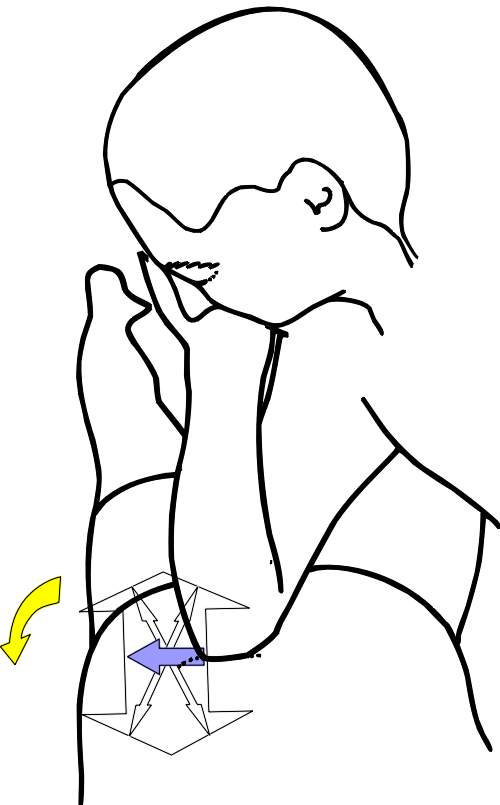 Figure 9.18
| Muscle Fibres | Primary Force | Secondary Force | Stretch Force | Contraction Force |
Active component
- Ask the patient to take a deep inhalation and hold it in.
- Ask the patient to contract their spinal muscles for 3 to 5 seconds using a 10% effort.
- Ask the patient to rotate their spine by lifting their rib cage on the opposite side off the table.
- Alternatively ask the patient to rotate his spine by lifting the pelvis on the opposite side, up and off the table or up towards their head
- Alternatively ask the patient to lift their leg on the near side, up and off the table.
- Resist the patient's effort with your applicator or with assistance from your free hand and maintain tissue lockup throughout the technique.
- Ask the patient to exhale and to relax their muscle contraction.
- As soon as you feel that the patient has relaxed their muscles completely (about 1-3 seconds) take up the tissue slack by increasing the primary tension.
- Take up the slack after each contraction and during exhalation.
- Repeat 2 or 3 times or as required.
Technique 13 Kneading or inhibition of thoracolumbar fascia, quadratus lumborum, and lower thoracic and lumbar erector spinae from T8 to L5 using leverage.
Patient
- Supine with the hips and knees flexed and thighs crossed.
- Take care not to compress the testes in males!
Therapist
- Stand by the side of the table near to the patient's pelvis.
- Reach under both legs and grasp the patient's top knee with your caudad hand.
- The popliteal fossa of the patient's bottom leg rests on your deltoid muscle.
- You should now have secure hold on the patient's lower limbs, which are locked in a fixed position and through the lower limbs you should be able to easily control the patient's pelvis and lumbar spine.
- Rotate the patient's legs away from you to expose the area to be treated. This should be on the side of the spine nearest you.
- Make contact on the tissue with your applicator.
Applicator
- Fingertips flexed or extended, or pisiform, or heel of hand, or thenar eminence or dorsum of clenched fists (MCP joints).
 Figure 9.22
| Muscle Fibres | Primary Force | Secondary Force | Stretch Force | Contraction Force |
Tissue tension
- Take up the longitudinal tension with flexion and rotation of the patient's hips. This force is produces flexion and sidebending in the lumbar spine. The patient's feet should point away from you as you execute the manoeuvre.
- The primary tissue tension is compression, which is taken up as you flex the patient's hips and as you bring the patient's knees towards you and take more of their body weight over your applicator.
- Use combinations of increased flexion, rotation of the pelvis toward you and sidebending of the pelvis away.
 Picture 9.13
Kneading or Inhibition
- Apply a rhythmical cycle of compression and longitudinal forces.
- Circumduct the hips to knead the muscles. Roll the patient's lumbar over your applicator.
- Your applicator can be used passively or actively push against the lumbar tissues.
- The forces generated by leverage can be massive so care should be taken not to damage your fingers.
- Use a sustained hold to inhibit the muscles.
- Your pressure should be just short of discomfort.
- To relax the muscle work with the patients breathing cycle, about 15 breaths per minute.
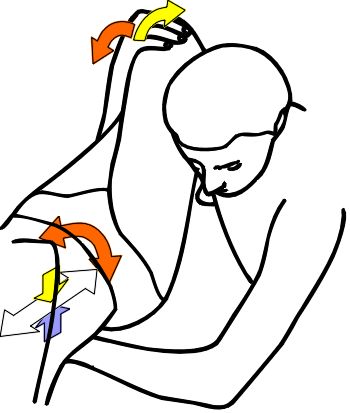 Figure 9.23
| Muscle Fibres | Primary Force | Secondary Force | Stretch Force | Contraction Force |
Active component
- Ask the patient to take a deep breath and hold it in.
- Ask the patient to attempt to push their legs back to the table (extend their hips and spine) or rotate their hips so their feet point towards you (sidebend their spine) for 3 to 5 seconds using a 20% effort.
- Resist their effort and maintain tissue lockup throughout inhalation.
- Ask the patient to exhale and to relax their muscle contraction.
- As soon as you feel that the patient has relaxed their muscles completely (about 1-3 seconds) take up the tissue slack by increasing flexion.
- Take up the slack after each contraction and during exhalation.
- Repeat 2 or 3 times or as required.
Technique 17 Kneading of lower thoracic and lumbar from T10 to L5.
Patient
- Sidelying near the edge of the table and close to the therapist.
- Their uppermost forearm is flexed 90 degrees and resting at the side of the body. The uppermost arm can be abducted to increase tension on the fascia and some muscles.
- The patient's lowermost arm rests in front of their body. The exact position depends on the patient's body type. It should prevent the trunk from tipping over from its sidelying position by stopping rotation but permit sidebending into the table when the appropriate forces are applied.
- If the patient has a scoliosis a pillow may be placed under the apex of the convexity. To treat the shortness the patient should lie with the scoliosis concave up.
- The lowermost leg is flexed 90 degrees at the hip and 90 degrees at the knee.
- The uppermost leg is flexed about 80 degrees and the pull from the abductors helps tilt the pelvis and sidebend the lumbar into the table.
 Picture 9.17
Therapist
- Stand by the side of the table facing the patient.
- Lean over the patient's rib cage and shoulder.
- Rest your cephalad forearm on the side of the patient's chest and under their arm and forearm. The patient's arm is draped over your arm.
- Rest your caudad forearm on the lateral side of the patient's pelvis, just superior to the greater trochanter. The contact will vary depending on the patient's body type.
- Grasp the uppermost paravertebral muscles with the fingertips of both hands.
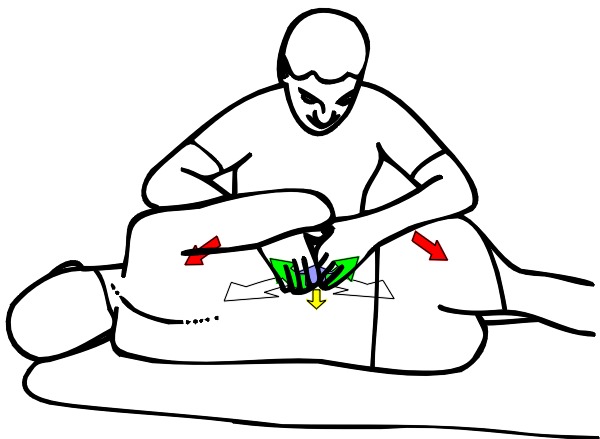 Figure 9.28
| Muscle Fibres | Primary Force | Secondary Force | Stretch Force | Contraction Force |
Applicator
- All fingertips of one or both hands.
Tissue tension
- Take up the primary tissue tension with compression and a medial to lateral transverse force by pulling up on the paravertebral muscles with your fingertips.
- Take up the secondary tissue tension by pushing in an oblique direction with your fingertips.
- Take up the longitudinal tension by starting the technique with the patient's spine sidebent over a pillow placed under the patient's side.
- Take up the longitudinal tension by pushing your forearms lightly down on the rib cage and pelvis and moving your elbows apart in a superior and inferior direction respectively.
- Your forearm pressure on the patient's rib cage and pelvis provides stabilisation and leverage.
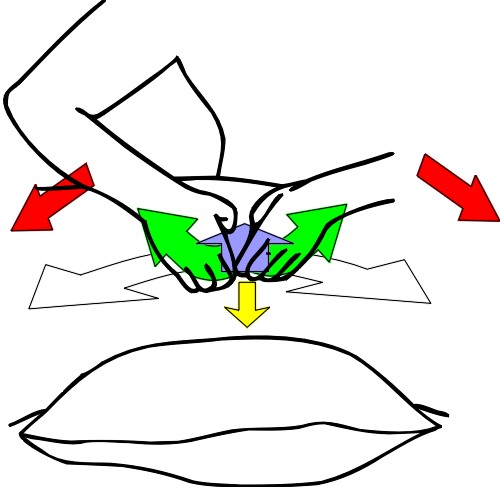 Figure 9.29
| Muscle Fibres | Primary Force | Secondary Force | Stretch Force | Contraction Force |
Kneading
- Apply a rhythmical cycle of primary, secondary and longitudinal forces.
- When the muscle is at an optimal level of longitudinal tension increase the transverse pressure or vice versa as you pull up on the paravertebral muscles with your fingertips, push your elbows down and apart.
- Push on the rib cage in a superior direction and on the pelvis in an inferior direction with your forearms.
- Your pressure should be just short of discomfort.
- To relax the muscle, work with the patients breathing cycle, about 15 breaths per minute.
- To stimulate increase your speed to about 40 cycles per minute.
Active component
- Ask the patient to take a deep breath and hold it in.
- Ask the patient to try to straighten their spine by opposing the force of your forearms for 3 to 5 seconds using a 10% effort. The spinal muscles will contract as the patient takes their pelvis superior and their shoulder inferior.
- Resist their effort and maintain tissue lockup throughout the technique.
- Ask the patient to exhale and to relax their muscle contraction.
- As soon as you feel that the patient has relaxed their spinal muscles completely (about 1-3 seconds) take up the tissue slack by increasing the primary and secondary tension.
- Take up the slack after each contraction and during exhalation.
- Repeat 2 or 3 times or as required.